
Social Distance Detection Application - Phase 2
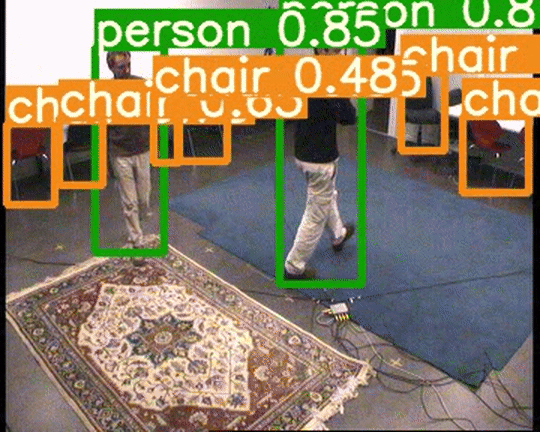
DEMO
Project Discription
This article continues the “Social Distance Detection Application - Phase 1” topic. In this post, we will talk about object detection models in depth, performance for YOLOv5 and Detectron2 in Colab default GPU and the bird eye view conversion improves social distance measurement
Mask ON 😷.
YOLOv5
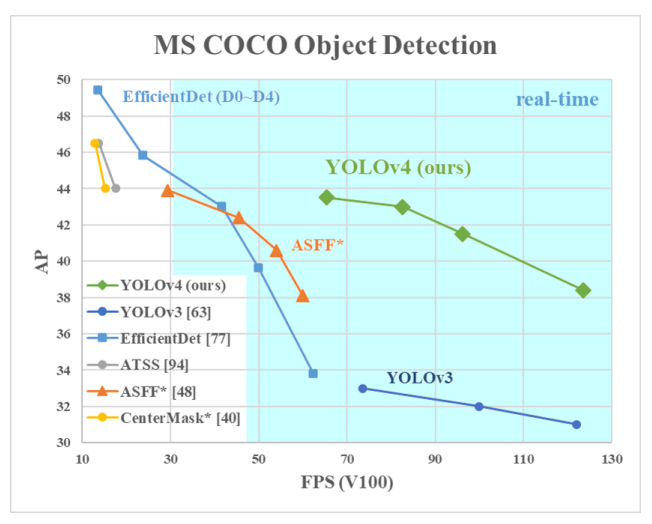
YOLOv5 is the latest model(up to 8/11/2020) of YOLO family, and is inarguably the fastest and most accurate YOLO model amongst or versions, all even in the industry. YOLO is notoriously famous for its inference speed and weight/model size, and the team is also crazy about enhancing the performance on those aspects. Currently the fastest speed for video object detection is up to 140FPS, and even compatible on mobile devices.

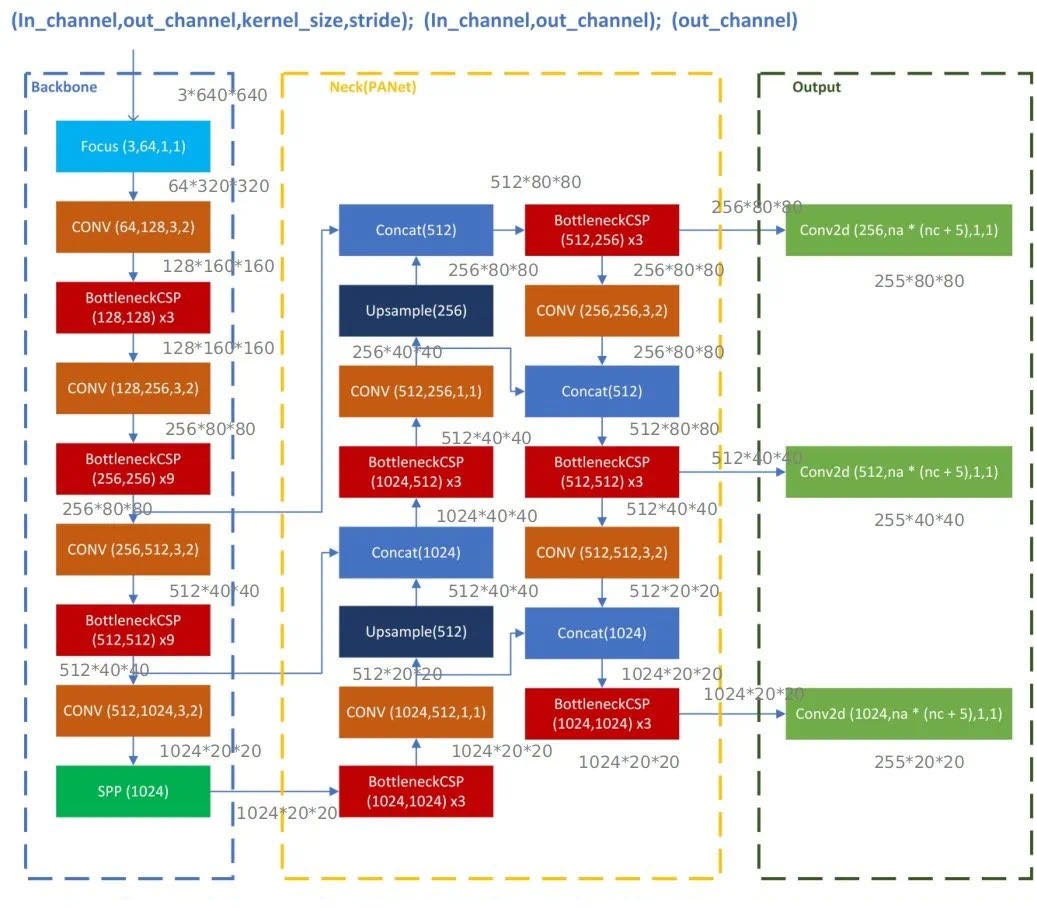
Model Architecture
-
Backbone: CSPNet: A New Backbone that can Enhance Learning Capability of CNN
Backbones mainly are used for extracting importance features from input image/frames. YOLOv5 uses CSPNet backbone to accelerate the image processing speed.

CSPNet Backbone Performance -
Neck: Path Aggregation Network for Instance Segmentation(PANet)
Model necks are mainly used for feature pyramids generation, which works perfectly on detecting same objects in different scales. Model neck passes image features to prediction layer and feed into the head. Some other famous feature pyramids are FPN and BiFPN, which works pretty well with Fast R-CNN and Faster R-CNN
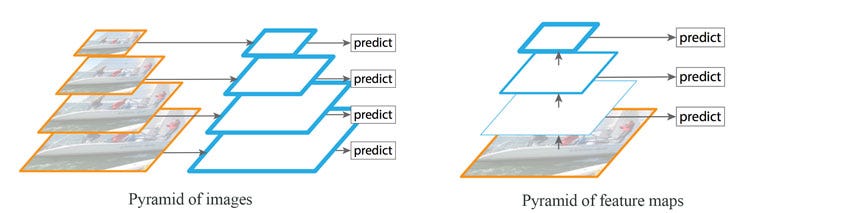
Feature Pyramid Networks for Object Detection -
Head: Detection on features, generating bounding boxes and predict categories.
Inferencing & Predicting
Data Labeling
YOLO family has its very own labeling format. Before we get to the pipeline setup, let’s first look at how it labels and outputs for each image
For each {image}.jpg, we have a labeled file {image}.jpg with the same name on {image}.txt.
In the output file {image}.txt, we have format <object-class><x><y><width><height>, where
<object-class>represents object category with: ‘person’, ‘bicycle’, ‘car’, ‘motorcycle’, ‘airplane’, ‘bus’, … where 0 stands for ‘person’, 1 stands for ‘bicycle’ and so on<x><y><width><height>are float point proportional to image actual height and width, i.e.<height> = <abs_height>/<image_height>. Ranges from 0.0-1.0, where<x><y>is the center of the image.


Pipeline Setup
One huge improvement for YOLOv5 is that compared to previous YOLO models, YOLOv5 is purely written in PyTorch, and therefore well maintained and ready for production.
The code setup in Colab is also very easy. First download and install the YOLOv5 dependency by running block
!git clone https://github.com/ultralytics/yolov5  # clone repo
!pip install -U -r yolov5/requirements.txt  # install dependencies
%cd /content/yolov5
Make show your runtime is GPU in colab as well.
The the dependency
import torch
from IPython.display import Image  # for displaying images
from utils.google_utils import gdrive_download  # for downloading models/datasets
print('torch %s %s' % (torch.__version__, torch.cuda.get_device_properties(0) if torch.cuda.is_available() else 'CPU'))

import torch.backends.cudnn as cudnn

from models.experimental import *
from utils.datasets import *
from utils.torch_utils import *
import utils.torch_utils as torch_utils
from utils.general import (
    check_img_size, non_max_suppression, apply_classifier, scale_coords, xyxy2xywh, plot_one_box, strip_optimizer)
from utils.torch_utils import select_device, load_classifier, time_synchronized
from google.colab.patches import cv2_imshow
After that, put in all the images/video you want to detect inside colab directory yoloV5/inference/images, and then run either the following blocks. The result can be obtained in directory yoloV5/inference/output
The first block does all the jobs already, which simply runs the detect.py in yoloV5, but with preset parameters
!python detect.py --source ./inference/images/ --save-txt --classes 0 --weights yolov5s.pt --conf 0.4
The following block spread out the detect.py and customize the benchmark.
You can also checkout YOLOv5 official doc for fine-tunning the model and training on your own dataset
Benchmark On YOLOv5 & Detectron2
-
Detectron2 Baseline
-
Dataset
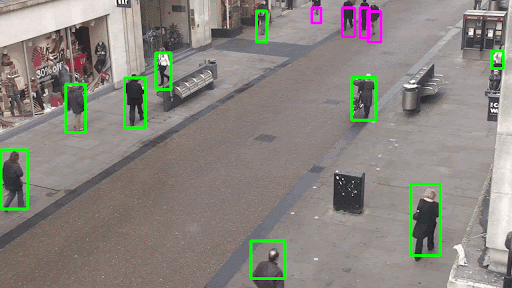
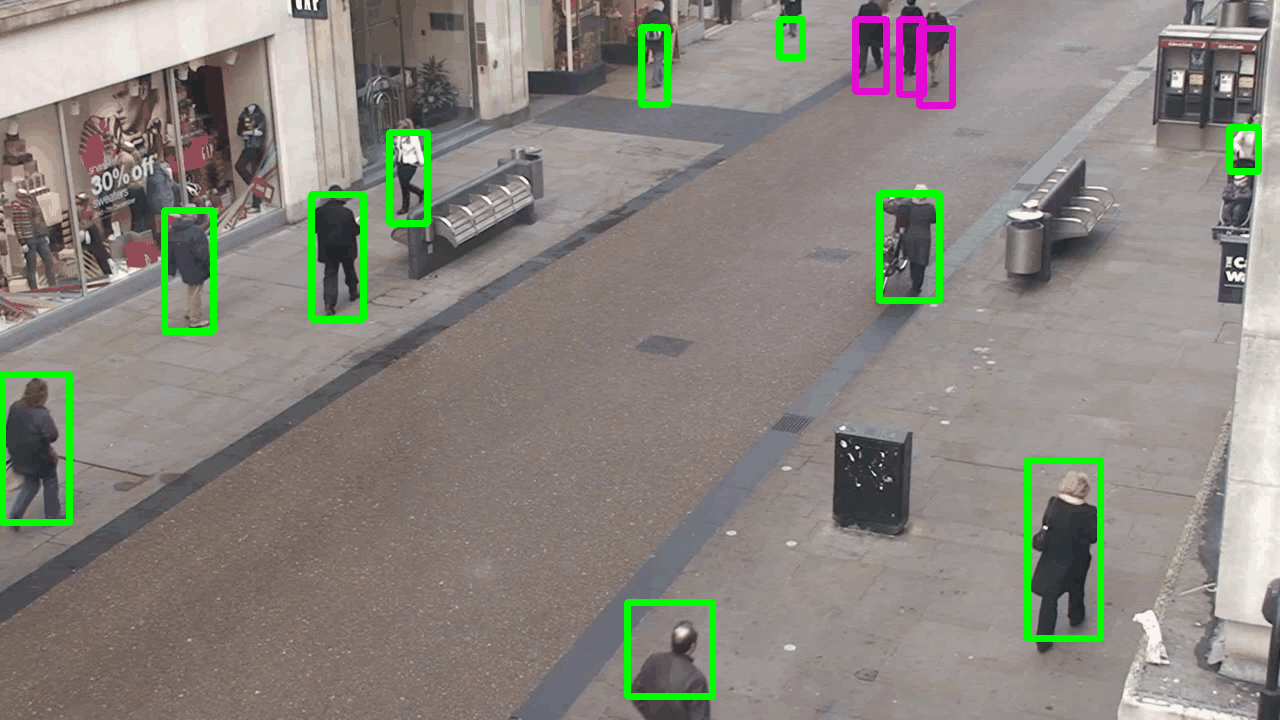
The dataset we are using are Multi-camera pedestrians video from EPFL, Joint Attention in Autonomous Driving (JAAD) Dataset and some uncalibrated camera videos donated as ‘custom dataset’. Those dataset are selected purposely since our social distance detection program will mainly be used for public area pedestrian walks, and analyzing real time camera footages. The dataset from EPFL contains simulation for multiple person random walking, which can be used to test on the model’s computation capability. Dataset JAAD contains footage shot in cars, and videos contain various crosswalks and pedestrians are selected to test on the scalability of the models. Finally, the custom dataset is also selected to increase the variability among datasets and test on models’ robustness.
-
Testing Environment
This test is set up in the Colab notebook environment, facilitated by default GPU (Tesla K80 GPU) setting. For Detectron2, since there are a lot of model settings, we are using Fast R-CNN R50-FPN backbone on RPN & Fast R-CNN baseline model for top-class prediction accuracy. For YOLOv5, we accept all predefined parameters such as the number of full connections and CNN layers. We use pre trained YOLOv5l weight to maintain a fast GPU speed, while achieving high AP(Average Precision).
\(\begin{array}{|l|l|l|l|l|} \hline \text { FPS} & \text { JAAD video 0067 } & \text { EPFL 6p-c1 } & \text { EPFL 4p-c0 } & \text { Custom video } \\ \hline \text { YOLOv5 } & 0.013 \pm 0.002 \mathrm{s} & 0.011 \pm 0.002 \mathrm{s} & 0.011 \pm 0.001 \mathrm{s} & 0.031 \pm 0.01 \mathrm{s} 28 \\ \hline \text { Detectron2 } & 0.512 \pm 0.201 \mathrm{s} & 0.332 \pm 0.521 \mathrm{s} & 0.385 \pm 0.028 \mathrm{s} & 0.529 \pm 0.511 \mathrm{s} \\ \hline \end{array}\) Table 1: Object Detection Inference Speed per 300 frames
\(\begin{array}{|l|l|l|l|l|} \hline \text { Error} & \text { JAAD video 0067 } & \text { EPFL 6p-c1 } & \text { EPFL 4p-c0 } & \text { Custom video } \\ \hline \text { YOLOv5 } & 1 / 300 \mathrm{frm} & 3 / 300 \mathrm{frm} & 0 / 300 \mathrm{frm} & 0 / 300 \mathrm{frm} \\ \hline \text { Detectron2 } & 0 / 300 \mathrm{frm} & 2 / 300 \mathrm{frm} & 0 / 300 \mathrm{frm} & 0 / 300 \mathrm{frm} \\ \hline \end{array}\) Table 2: Object Detection Inference Accuracy per 300 frames
Bird Eye View Conversion
This part it very tricky, even a trade secret for some small companies. The Bird-Eye-View problem is mainly a problem of perspectives, where though distance between people is finite, it changes with the distance between objects and lens, i.e. the extrinsic matrix.

In real life, the real-world distance would be much easier to estimate with extrinsic matrix, intrinsic matrix, or multiple cameras if you have a full control of the dataset, and even perform a 3D stereo reconstruction.

However, in our case, we have no way to find the real world distance with above matrices. Therefore, we used a four-point mapping technique, selecting a region in picture that is rectangular in real world(usually the road) and performs a 2D wrapping to actually make it rectangle. All the distance will be calculated based on the wrapped coordinates.
We know that this method is limited, error-prone and needs human labeling for different videos, but the result is ideal.
Take a look at the github code
Contact Me
If you are interested in my projects or have any new ideas you wanna talk about, feel free to contact me!
A BEER would be perfect, but remember NO CORONA! 🍻